Epson iProjection for iOS - Frequently Asked Questions

QUESTIONS:

Epson iProjection Support
1.    Q: How do I put documents into iProjection's Document option?
2.    Q: Which projectors are supported?
3.    Q: My iOS device is not connected to the internet after I connect it to my projector with iProjection. Why?
4.    Q: Can I use the iProjection app to display a file attached to an email?
5.    Q: I don't have the optional wireless module for my projector, can I still use iProjection?
6.    Q: Which devices are compatible with iProjection?
7.    Q: How do I display a Keynote file with iProjection?
8.    Q: Which file types can I display with iProjection?
9.    Q: Can I control my projector with iProjection?
10.  Q: Want the latest information on wireless projection?

ANSWERS:

Epson iProjection Support
1.    Q: How do I put documents into iProjection's Document option?
     

A: Do the following:


1. Connect your iOS device to your Mac or PC.


2. Open iTunes.


3. Select your iOS device in iTunes.
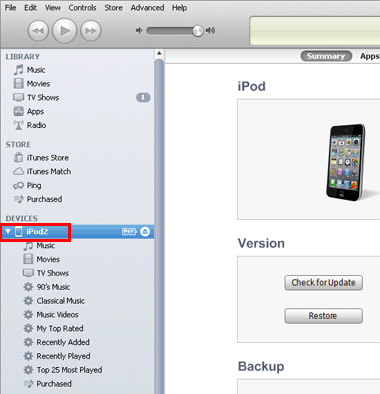

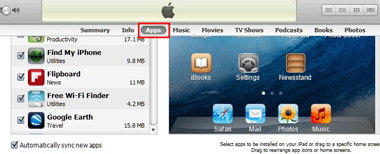
4. Select Apps.

5. Scroll to the File Sharing section of the Apps window. Select iProjection, then Add.
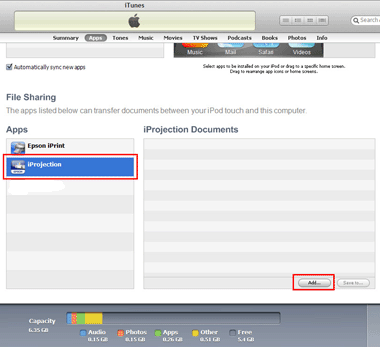

6. Navigate to the file you'd like to place in Documents, select the file, then click Open. The file will now be in the Documents option.

 
_____________         ____________
 
2.    Q: Which projectors are supported?
      A: To view projector compatibility list...Click here.
 
_____________         ____________
 
3.    Q: My iOS device is not connected to the internet after I connect it to my projector with iProjection. Why?
     

A: If your iOS device is connected to the projector via a direct wireless connection (also known as an Adhoc connection), your iOS device is no longer communicating with your network (for internet access).

You'll need to connect your projector and iOS device to your wireless network to retain internet access. To set up the connection, do the following:

  1. Select Advanced as the Communication Mode on the projector.
  2. Enter the SSID (network name) into the projector using its menu system.
    • Note: If your router assigns IP addresses, select IP Settings and set DHCP to On.
    • If your network is set up with security, select Security and enter the security type, PSK or encryption key of your network.
  3. Save the settings and exit the menus.
  4. Select LAN on the projector's remote.
  5. Connect your iOS device to your Wi-Fi network.
  6. Use iProjection to connect to your projector
 
_____________         ____________
 
4.    Q: Can I use the iProjection app to display a file attached to an email?
     

A: Yes. The projector needs to be connected to your network and the projector's Communication Mode should be set to Advanced. See your projector's documentation for instructions.

To view the attached file, do the following:

  1. pen your e-mail in your iOS device.
  2. Open the attached file (.pdf, .ppt, .xls, or .doc files are supported).
  3. Tap the top of your image or document, select Open In, then select iProjection.
  4. Connect to your projector when you see the prompt to do so.

 
_____________         ____________
 
5.    Q: I don't have the optional wireless module for my projector, can I still use iProjection?


A: Yes, you can still use iProjection if your network supports wired and wireless connections and your projector has a RJ45 LAN port. Follow the steps below to set it up:

  1. Connect your projector with a RJ45 connection to your network.
  2. Connect your iOS device with a wireless connection to the same network your projector is connected to.
  3. On your iOS device, tap iProjection, then tap projector.

 
_____________         ____________
 
6.    Q: Which devices are compatible with iProjection?
     

A: Apple iPad, iPad2, iPhone, iPhone 3GS, iPhone 4, iPhone 4S, iPod, iPod Touch (3rd Generation).

 
_____________         ____________
 
7.    Q: How do I display a Keynote file with iProjection?
      A: Do the following:


Note: If your Keynote file is already on your iOS device, go to step 10.

  1. Save your Keynote file to your Mac or PC's Desktop.
  2. Connect your iOS device to your Mac or PC.
  3. Open iTunes.
  4. Select your iOS device in iTunes.

  5. Select Apps.

  6. Scroll to the File Sharing section of the Apps screen. Select iProjection, then Add.


  7. Navigate to the Keynote file, select the file, then click Open. The file will now be in iProjection's Document option.
  8. Select to eject your iOS device from iTunes.
  9. Tap the Projector button to open the Select Projector menu.
  10. Tap the name of your projector in the list of available projectors.

    Note: If your product doesn't appear in the list, tap Other. Enter your projector's IP address in the IP Address field. If you don't know the IP address, you can find this information in the Network section of the projector's menu or by pressing the LAN button on your projector's remote control. See your projector documentation for more information.

  11. Tap OK when prompted to confirm the connection to the projector.
  12. Tap Documents.

    Note: If you're using an iPad, tap Files and then tap Documents.

  13. Tap your Keynote document.

  14. The presentation should now display on your projector.
 
_____________         ____________
 
8.    Q: Which file types can I display with iProjection?
     

A: The following are supported:

  • Microsoft Word (.doc, .docx, Office 2003 or later)
  • Microsoft PowerPoint (.ppt, .pptx, Office 2003 or later)
  • Microsoft Excel (.xls, .xlsx, Office 2003 or later)
  • Keynote (.key)
  • Adobe PDF (.pdf, PDF 1.7, Acrobat 8 compatible or later)
  • .JPG and .PNG
 
_____________         ____________
 
9.    Q: Can I control my projector with iProjection?


A: Yes. There is a Remote Control option within the app. See Using the Remote Control Feature for instructions.

 
_____________         ____________
 
10.  Q: Want the latest information on wireless projection?


A: For more information see:- Epson iProjection microsite.

 
_____________         ____________